Webforms Guide
Online forms are a great way to connect with your users, gather needed information from them, and move away from pen-and-paper methods of collecting and processing data. We’ve all filled out online forms before, from subscribing to a newsletter to giving feedback or entering a contest. In almost any case in which you need to extract information from your audience for analysis, you can use a form.
Many online tools bring form creation to your fingertips — no HTML, javascript, or server-side coding experience required. On GovHub, content managers can use a content type called Webforms to create a simple form in minutes.
But while technology makes it easy to get started, good results come from effective form design.
When you create an online form, you need users to take the time to accurately respond to the prompts you provide. We cannot take those expectations for granted; we have to design for them.
Who Should Use This Guide?
This guide, while written primarily with GovHub customers in mind, contains several guidelines and tips for online forms on any platform. The next two sections in particular, Form Best Practices and Making a Plan for Your Form, contain lots of platform-agnostic, strategic information that will help anyone working with interactive content.
Throughout the guide, we use the term “Webform” which refers specifically to the Webform Drupal content type available on GovHub sites.
When Should You Use Webform?
You can use online forms to collect questions, feedback, complaints, event registration, requests for documents or photos, and so much more. Nearly any reason that someone might need to get in touch with an agency could be cause for a form.
Aside from data collection, Webforms can help users figure out their next steps or navigate a complex process. Through the power of conditional logic, editors can set up Webforms to gather answers from the user and immediately respond with related information or follow-up prompts. This is one simple way to customize users’ experience, helping them find what they need faster and easier.
Form Limitations
Communication with forms is asynchronous, meaning that the two parties can’t easily go back and forth. On the one hand, this is a great benefit because it means the user can fill out the form when it’s convenient for them, even outside of normal business hours. However, most contact forms will need to collect some type of contact information from the user (phone number, email address, etc.) to continue the conversation.
Best Practices
Identify the Goals
Start with goals.
What are your goals? Maybe you’re trying to reduce phone calls and office visits. Maybe you need to know who’s coming to an event. Whatever the specific purpose of the form, you need to collect enough information from the user to take the next step forward.
What are your users' goals? Their goal is to get an answer to their question, to know what to do next, and to complete their task. In nearly every case, their end goal is actually not to contact you, but to get something done.
Ask the Right Questions
Before you crack open a form builder, make a list of the information you need to collect. Have a purpose and plan for every field.
When making your list, start broad (contact details), then narrow it down (email address) by asking yourself these questions for each prompt:
-
Who in your organization will use the data?
-
Why do they need the data?
-
What will they do with the data?
-
What type of data do you expect to gather?
As you go through these questions, you might realize you’re not sure what exactly is needed or how the data will be used. When that happens, it’s possible you need to gather more information from your teammates. In some cases, you might find you don’t even need that prompt.
Sometimes you might just need to switch your approach, rather than remove a prompt altogether. By focusing on the true intent of the prompt, you’ll discover whether your first instinct is correct. For example, consider a prompt asking for gender. Will knowing the respondents’ gender identity answer what you need, or will it lead to assumptions about what you’re actually trying to understand? Maybe you just need to know how to refer to them, in which case title and pronoun prompts would be more appropriate.
Only Ask for What You Need Now
Every prompt in a form will cost the user time to answer. If your target respondents determine that the time it will take to complete a form isn’t worth its benefits, they might rush through their answers, or they might not complete it at all.
It will also cost an employee within your organization time to analyze. It’s one thing to sort through names and email addresses, but the analysis only gets more complex from there.
To save everyone’s time, our first goal should be to limit the total number of prompts in our forms. The fewer prompts, the fewer barriers to completing the form.
Second-guess everything. Ask yourself:
-
Do I need this data?
-
Do I need it now?
-
Will it impact our results?
If the answer to any of these questions is “no,” remove the prompt.
With that in mind, your form should mostly be made up of required fields. Granted, there are times some respondents might need to provide additional information on a topic, but that should be the exception. If you don't need it, then why is it on the form?
Use the Right Field Type
When putting together an online form, pay attention to field type. Specific elements (like Email, Phone, and Date) will often work better for collecting the right types of data than something more generic (like Text Field). Some benefits of specific field types include:
-
Validation requirements
-
Appropriate field display
-
Mobile-readiness
-
Accessibility compliance
Take Date, for example. When setting up a Date element in GovHub, you have the option of applying specific criteria. You can choose to show a calendar date picker. If you’re using a date picker, then you will set the date format — for example “Monday, June 21, 2021” or “06/21/2021.” You can also set criteria around acceptable dates and days of the week. This criteria means that unaccepted dates will not pass validation, and will not be selectable from the calendar picker.
Consider the mobile experience. Not only does choosing validation options keep you from getting words when you need a number, but it can also provide users on mobile devices with the right type of keyboard. For example, a Telephone field will provide users with a number keypad, and the Email field will make the @ symbol readily available.
By matching the element to the type of information you need, you can further customize the element to make the form easier to complete with valid responses.
Be Clear About Requirements
Users should never be uncertain about what the form is asking of them. Use the following:
-
Clear, concise field labels (e.g., “Email address” instead of something more wordy like “What is your email address?” or something less clear like “Address”)
-
Description text, as needed (e.g., “Provide the email address you used to set up your account.”)
-
Required field indicators (e.g., “required” in red text next to the field label) along with programmatic validation, so a user can’t submit or continue to the next page without filling in required fields
Additionally, use meaningful field keys so anyone looking at the form results knows exactly what the data means. For example, use “first-name” and “last-name” for field keys, not “name1” and “name2.”
Provide Options
Make sure you provide options when available. This is going to help you standardize your results. It's also going to make it easier for users to fill out the form.
When the number of possible answers is limited, use one of the following field types:
-
Checkboxes when users might select more than one of the provided options
-
Radio buttons when users should only select one option out of a fairly short list of possibilities
-
Dropdown lists when users should only select one option out of a long list of possibilities, especially if the options are in a logical order (for example, Georgia’s counties alphabetically, or days of the week chronologically)
By providing options, you’re making it easier to analyze the data you receive. However, if a user might need an answer other than those provided, it’s usually helpful to include an option titled “other” that will let them fill in their own response.
Know When to Keep Validation Loose
Though validation can often set your form up for success, there are times where fields need to allow for a wider variety of data.
For example, leave requirements for name fields loose. Don’t limit the number or type of characters allowed in a name field; numbers, hyphens, apostrophes, spaces, and other special characters show up in names, even if infrequently.
Show One Piece at a Time
Especially long forms may discourage users from even starting to fill it out. Of course, in government, our users probably still need to provide or receive the information that brought them to the form in the first place. But at some point they might decide a phone call or office visit will be easier than filling out a monster of a form.
We don't want to overwhelm our users by showing them too much all at once. At the same time, we want to set their expectations appropriately, not make them think the form will be easier to complete than it really is.
By breaking a long form into smaller, more digestible chunks, you’ll still gather all the information you need while keeping it straightforward to complete.
Multiple Pages
One way to break up a long form is to split it into multiple pages. Each page should focus on a distinct topic, like personal contact information. When your form has multiple pages, set expectations from the beginning so a user doesn’t trudge through the form not knowing what’s coming next or when it will end.
When building a GovHub Webform, you’ll provide a short title for each page which will display at the top of the form along with a total count of pages.
Conditional Logic
Another way to reveal information piece by piece is with conditional logic. This is a feature in many digital form builders, like GovHub’s Webforms, that changes something in the form based on user input. A common way this comes into play is making a field visible or hidden depending on the user’s response to another field. It might also affect the state (enabled/disabled), validation (required/optional), and more.
Not all information is needed from everyone who completes a form. Or some information needs to be answered differently depending on the person. Use conditional logic to provide follow-up questions based on how the user answered previous prompts.
You can also use conditional logic to reveal relevant information as the user fills out the form. For example, maybe your form has a dropdown to choose a topic. If you have information on your website that answers common questions related to this topic, you might conditionally display a blurb and link to that existing information when a user selects the related topic.
Group Related Items
Fieldsets
Fieldsets group similar questions together visually and programmatically. In GovHub, this displays with a short title and a subtle outline around the fields in the set. When a user sees fields grouped like this, they’ll understand that the fields are all related, which may clarify the prompts and make the form feel more manageable.
Composite Elements
In GovHub, Composite Elements are a set of pre-grouped and formatted fields that are meant to collect specific types of information. “Advanced Address,” “Name,” and “Telephone Advanced” are all types of Composite Elements. These elements provide several possible fields for you to choose from and set up as you build the form. These fields are all pre-formatted to collect the correct type of data, and certain fields will even pre-populate with options, like a dropdown list of U.S. states.
Once the form has collected some results, it will display the data in an easy-to-use format based on context. For example, in a confirmation email with form results, an Advanced Address field will display the address neatly like you would write it on an envelope; when you download these same results into a spreadsheet, however, the information will split into separate columns so you can sort through the list as needed.
Keep Results Secure and Private
Sensitive PII
Sensitive Personally Identifiable Information (PII) is any information that may stigmatize or adversely affect a person if compromised. This includes, but is not limited to:
-
social security number
-
date of birth
-
driver’s license number
-
medical information
Federal law has strict regulations on the collection of HIPAA data and Sensitive PII, including who can request and access the information, and the security rating of systems that store sensitive PII.
GovHub is not built to store sensitive PII.
Forms that gather and store Sensitive PII require high security systems. If you’re requesting potentially sensitive PII, it’s your responsibility to confirm appropriate methods of gathering that data with the appropriate people in your organization.
Other Sensitive Data
Even if you’re not requesting sensitive PII, you may be requesting information that requires some privacy. If that’s the case, take the time to evaluate how secure that information is in your system.
Are the form results submitted securely? HTTPS encrypts (almost) all information sent back and forth from a website to a user, and it verifies the identity of a website or web service.
On GovHub, all data is sent via SSL (over https). However, by configuring a form to send results over emails, the results lose some security.
Who else can access the form results in the back end?
On GovHub the default is that anyone with Editor access can see all form results, though you can manually adjust settings to only allow certain editors.
Be Considerate
Recognize emotionally sensitive information.
There are plenty of questions you could ask that aren’t PII, but can still have complicated answers and induce an emotional response. For example, this may include questions around family and marital status, gender, race, education, or employment status.
Of course, just because a topic might be sensitive does not mean we shouldn’t ask questions that need responses. But we can increase our response rate and reduce the friction of filling out a form if we think about how to frame potentially difficult questions.
Why do you need this information? Answer this question both for yourself (to make sure to Ask the Right Questions) and for the people filling out the form. In the field’s description or tooltip, explain why you need it, who will use it, and how it will be used.
For some questions that provide options, allow for a full range of possible responses. For example, gender and marital status should have an option for “Other” or “Custom.” Ethnicity should have options for “other” and the option to select multiple fields.
Treating form respondents with consideration and respect goes a long way to establishing trust. Every small step toward improving your form interactions will improve your results and your organization’s relationship with its audience.
Be Keyboard and Auto-Complete Friendly
Users need to be able to navigate your online content, including your forms, using only a keyboard. This can benefit everyone using your site, making it easier to get from one field to the next, but it’s essential for other users who can’t easily use a mouse or trackpad. Test the tabbing order and confirm whether you can complete all form fields using only a keyboard (no mouse).
Also ensure autocomplete answers are readily accessible to screen readers, keyboard-only users, and mobile users. In some cases, these settings may even be used to convert a form to a conversational interface like Amazon Echo or Google Home. When you Use the Right Field Type, you’re well on your way to a form with great auto-complete features.
Webforms in GovHub are already set up for accessibility, like keyboard navigation and auto-complete.
Encourage Self-Service
Contacting you should usually be the user’s last resort. When possible, it’s typically most effective to point the user to the information already available online. Every form submission that comes in is one more collection of data for someone to sort through.
If you have multiple ways for the user to get what they need, then make sure that you're ordering the page in a way that makes it faster for the users and more manageable for you. This might mean that you provide multiple forms of contact in order from least hands-on to most. With this in mind, your contact page might have the following flow:
-
Automated chatbot
-
Form (including links to existing content with Conditional Logic where possible)
-
Email (if provided separate from the form)
-
Phone number
-
Office location
Think of the Whole Experience
Take a step back and think about the user's journey holistically. Your agency’s contact form is one piece of many; they’re getting information from your website, call centers, and service centers. They’re also hearing from organizations and individuals who aren’t related to your agency at all. At the end of the day, this form will be a small piece to the larger puzzle, so think of where users are coming from and where they’re going.
With this in mind, you’re ready to Plan Out the Form!
Building the Form
Please visit our knowledge base for step-by-step instructions on how to build a Webform.
Getting Started
Better Forms for Better Results
In this series we’ve covered a lot of the best practices around form design. As is the case with most interactions with other people in this world, there are so many options and so many things to consider to get the best result from those interactions. Where forms differ from conversations, however, is that we are separating the question portion of the interaction from the answer portion. They’re happening at different times from different locations. So the more we can anticipate friction points or possible responses to our questions ahead of time, the more likely we are to accomplish our goals, whatever they may be.
To recap: better forms start with empathy and consideration towards the humans who will be filling these out. Then when creating the fields, better forms benefit when you are clear with what you need, validate fields that have limited response types, and mark your input fields with labels, keys, and descriptions. Finally, they rely on the appropriate level of privacy and security of the results relative to the information you gather.
Consider the user’s true end goals. They are not trying to contact you. They want to get information that they need in order to complete their task. Keep it simple and question everything! Do you really need that information and do you need it now? Finally, make a plan. Think about it holistically, as part of the user’s journey. The Webform is just one place where they’re interacting with you, your agency, and your website.
And so where does this leave us?
This is for both existing forms that you have on your website, and also maybe some new ones.
Take a look at what forms you have now. You probably have a contact form. Maybe you have some registration forms. Maybe you have forms to collect specific type of information, like feedback on something or complaints. Take a look at these and see if it's following these best practices.
And then also, maybe consider other opportunities. Do you have complex processes that your users might benefit from being guided through?
Whenever you have questions about Webforms, feel free to open a support request and we will get back with you. Anything — especially that is maybe more complicated technically — you saw earlier that we just got a PDF from DHS and we worked with that to help them create this Webform for an interactive process for their users. So definitely use us as your resource. We are happy to help and make your job easier and make the user's experience as good as possible.
Planning Out the Form
Before jumping right into the form builder, take a moment to consider what you need and put together a plan for your form.
These steps will reference this spreadsheet template in Google Sheets. When you open the spreadsheet, go to File > Make a Copy or File > Download to follow along.
The following steps outline one way to think through creating an effective form. Feel free to adjust the process according to your situation. The takeaway is to treat the form with intention, from understanding the big picture down to nailing the details of every field.
Planning out a form isn’t always straightforward. Throughout the process, you might realize a better way of collecting information that you hadn’t considered before. As you complete each step, return to your progress from previous steps to make sure everything still works.
List What You Need
To start, strip away all complexity and make just a simple list. This really points back to our first few Form Best Practices: Identify the Goals, Ask the Right Questions, and Only Ask for What You Need Now.
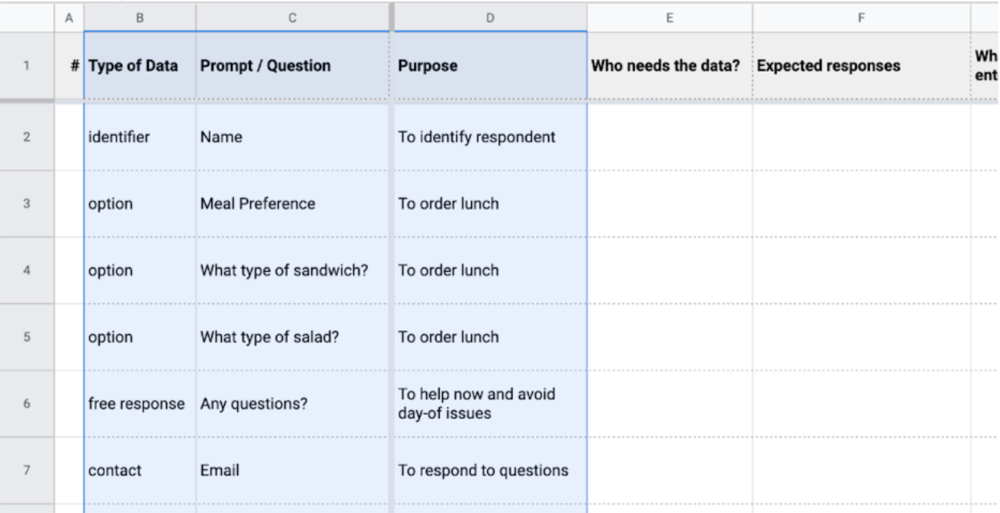
Start by identifying the broad type of data and your purpose for collecting it. You might do this at the same time as determining the specific question or prompt, but be ready to adjust the exact prompts as you better understand the needs of the form.
Complete columns B-D.
Identify the Process and Expectations
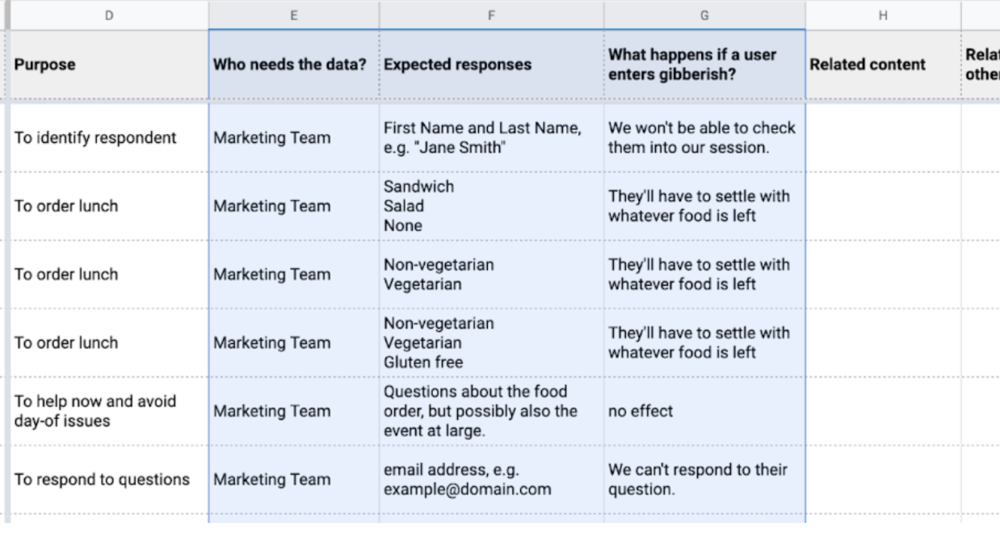
Next, consider who will be using the data, what you expect it to include, and what happens if a user enters a nonsensical response just to get through the form. If the person who ultimately needs the data is not the person who will initially need to receive the results, note that as well.
In GovHub, submission emails can be conditional based on responses. For example, a “Topic” dropdown field might determine that submissions related to one topic send an email to one person, and submissions related to another send to someone else.
With this in mind, consider what will be done with the data. This can also inform what fields to include. For example, should you be collecting phone numbers, email addresses, or both? Knowing who in your organization will handle the responses and what they will do with them might answer that question. Take another look at the prompts to see whether they’ll get you what you need in order to take action.
Complete columns E-G.
Once you’ve identified the process and expectation, ask yourself:
-
Are the expected responses the ones that I need?
-
Do the prompts need adjusting to get the responses I need?
-
How much of an issue is the effect of gibberish responses?
-
How can I mitigate gibberish responses?
Set the Order and Define Relationships
Set the order of page content, including fields in the form and even content that might exist outside of the form. What order will Encourage Self-Service?
Always consider the user’s mindset throughout each piece of the form:
-
What information makes sense together?
-
Is certain data needed from some users, but not from others?
-
Should answers to some prompts determine which other prompts display?
-
Might you need to add any follow-up prompts you don’t have already?
-
Is there related information available that might help users answer certain prompts?
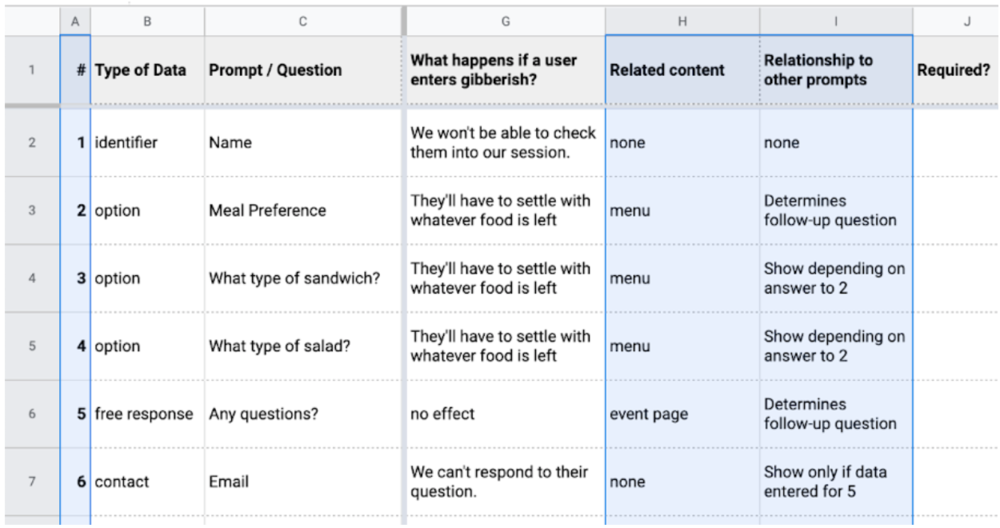
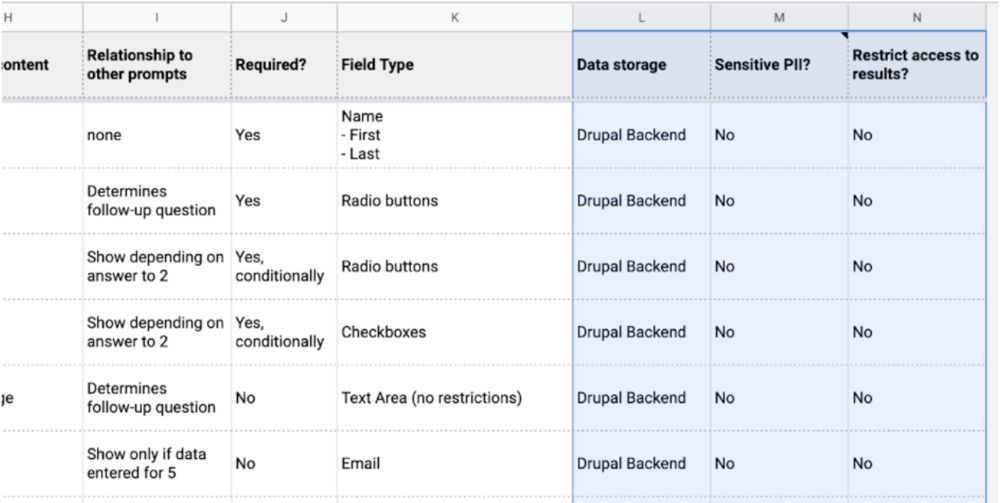
Rearrange your rows as needed and complete columns A, H, and I.
Determine Element Types
Now that you have a better picture of what you have and need, you can pick out the most appropriate Form Elements.
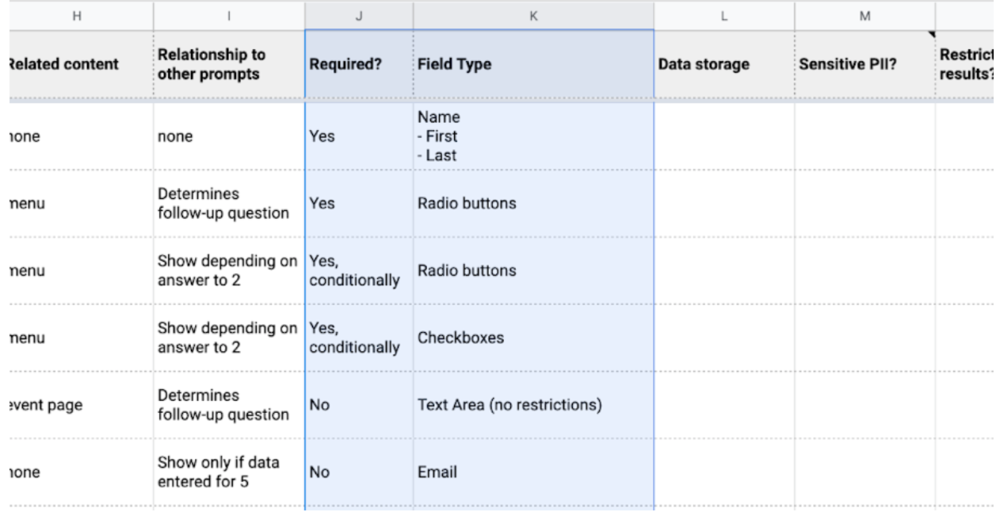
Complete columns J-K.
To help you decide what elements will work best, it might help at this point to open up your form builder and start Building the Form. Try adding fields and adjusting their settings. If you do, just make sure to finish thinking through these final steps.
Check for Security Needs
In the final step, double-check your security needs. Where will the data be stored, will it contain any Sensitive PII, and do you need to restrict who can access the results?
Complete columns L-N.
Consider the Full Process, Start to Finish
At this point, you should have a pretty clear idea of the user experience for your form. What’s next?
Users will see a confirmation page upon completion. If you have more information on a related topic or can estimate when they should expect to hear back from you, include that here.
You can also set up email confirmation messages to send automatically to the respondent (assuming they provided an email address) and someone on your team. At the most basic, include a friendly message and a review of their responses (excluding any potentially sensitive information for the sake of security).
When Success ≠ Submission
Let’s go back to the beginning and remember goals. Your goal is probably not to receive a form submission, and your user’s goal is probably not to submit a response. Ultimately, you want to provide a service and your user wants to access it.
With that in mind, there are times when a form might work best to guide users to existing information, rather than to collect data. Take advantage of Conditional Logic when you Define Relationships to continue to promote self-service. If the answer already exists, maybe the user doesn't need to contact you after all.
Publish a Webform
To make a webform viewable and usable by the public, you need to reference the webform. This is the 2nd part in the process to create and publish a webform.
-
Click on Content > Add Content.
-
Click on Webform.
-
Required fields are:
-
Enter a Title.
-
Select the Webform from the drop down selector.
-
-
Optional fields include:
-
Enter instructions or an explanation in the Body field. This appears above the webform.
-
Expand Webform Settings:
-
Open – Viewable and submissions can be made.
-
Closed – Fields do not display and a message alerts visitors that the webform is closed.
-
Scheduled – Select date/times to open and close accepting submissions.
-
-
-
Check the box to Publish.
-
Click on the Save button.
Testing the Form
And, finally, make sure that you thoroughly test the form. Make sure that, depending on what they select, that the email is actually sending to the right people. So, if you haven't taken a look at your Webforms since your site migrated to GovHub, then maybe just do a few tests. Make sure that emails are actually sending correctly. If you have any conditional logic built into the form, or if you have multiple pages, just take a walk through and make sure that everything is working as expected.
To test the form:
-
Either manually fill out the form and Submit.
-
You can also use the Test tab to generate data.
To generate multiple test results:
-
Fill out the newsletter a few times
-
Click on the Results tab.
-
Click on the Customize button to change the columns shown if necessary.
-
You can mark particular submissions with a Star or Lock or Add Administrative Notes.
-
-
Select the Edit button next to each submission to Edit, View, Clone, Duplicate, or Delete submissions.
-
The Download sub-tab allows you to export the submissions in a variety of ways.
-
You can filter based on date or submission ID, so you don’t need to download all the data at once if it's not necessary.
-
Viewing and Exporting Results
Webforms make data collection simple because you are also able to export your collected data into an Excel spreadsheet or CSV for further analysis.
Webforms can send results directly to a custom relationship management tool (CRM) for more complex analysis and secure data transfer. If you’re doing some additional processing in another system, then you can use this to automate data entry rather than getting form results in an email and entering it manually.
And making this a little bit more sophisticated, you can also send the results from your GovHub Webform directly to a customer relationship management tool for more complex analysis and secure data transfer. So, think of this as an alternative to an email notification. If you're doing some additional processing in another system, then you can use this to automate entering that data, rather than needing to get the form results in an email and then entering that manually.
How to Add Email/Handler
Consider the submission process. If someone at your agency is the best person to answer questions about a particular topic, form submissions dealing with that particular topic should go to them. Also, think about how you’re planning to respond to these submissions. Make sure you’re asking for the correct kind of contact information!
While the Results tab allows you to review submissions, it can also be useful for results to be emailed once submitted.
To add an email to receive webform responses:
-
Click on Settings from the toolbar.
-
Next, click on Emails/Handlers.
-
Click on Add email.
-
From the Add Email Handler window that you will see open on the right side of the page, under general settings tab, input the following:
-
General Settings:
-
Title. Note: This is the title for the new email address.
-
Administrative notes (optional). Note: Entered text will be displayed on the handlers administrative page and replace the handler’s default description.
-
-
Sent to:
-
To email. Note: This is the person(s) responsible for receiving the webform.
-
Enter a Carbon Copy or CC email (optional).
-
Enter a Blind Carbon Copy or BCC email (optional).
-
-
Send from (website/domain):
-
Input a From email address. Note: The from email address should be from you. It should be your brand, company, organization or website entity. Click the down arrow to select from the list. The ame applies for the From name.
-
Input a From name.
-
-
Reply to (individual/organization):
-
Input a Reply-to-email. Note: This email address is the email address a recipient will see when replying to an email. Leave blank to automatically use the from address.
-
-
Message:
-
Select Subject. Note: Click the down arrow for the list of options.
-
Select Body (required). Note: Click on the down arrow to select body type from the list of options.
-
-
Finally, click Save.
-
Webform Elements
You can collect data in the following formats using Webforms:
Basic Elements
- Checkbox - provides a form element for a single checkbox.
- Hidden - provides a form element for an HTML 'hidden' input element.
- Text Area - provides a form element for input of multiple-line text.
- Text Field - provides a one-line text field form element.
Advanced Elements
- Autocomplete - provides a text field element with auto completion. The Autocomplete Element allows you to add a text field and populate values that visitors can access as they start to type in the field. This is good if you want all the responses in a text field to be in the same format or accept the same set of terms, while also giving visitors options to pick and choose.
- CAPTCHA - provides a form element that determines whether the user is human.
- Color - provides a form element for choosing color.
- Email - provides a form input element for entering an email address.
- Email Confirm - provides a form element for double-input of email addresses.
- Email Multiple - provides a form element for multiple email addresses.
- Number - provides a form element for numeric input, with special numeric validation.
- Range - provides a form element for input of a number within a specific range using a slider.
- Rating - provides a form element to rate something using an attractive voting widget.
- Search - provides form element for entering a search phrase.
- Signature - provides a form element to collect electronic signatures from users.
- Telephone - provides a form element for entering a telephone number.
- Terms of Service - provides a terms of service element. The Terms of Service Element lets users accept any terms related to the use of the Webform or your site with a checkbox and a separate link for those terms.
- URL - provides a form element for input of a URL.
- Value - Provides a prom element for storage of internal information.
Composite Elements
Speed up your Webform development with multiple fields to collect common information in a single click. Quickly add multiple fields for collecting things like an address, a person's full name including their title and suffix, or multiple types of phone numbers like cell or fax.
These are pre-grouped and formatted fields that are meant to collect specific types of information. For example, an address, a name, or a telephone - something that brings together multiple fields all in one group.
- Basic Address - provides a form element to collect address information (street, city, state, zip).
- Advanced Address - provides advanced element for storing, validating, and displaying international postal addresses.
- Contact - provides a form element to collect contact information (name, address, phone, email).
- Custom Composite - provides a form element to create custom composites using a grid/table layout.
- Link - provides a form element to display a link.
- Location - provides a form element to collect valid location information (address, longitude, latitude, geolocation) using Algolia Places.
- Name - provides a form element to collect a person's full name.
- Telephone Advanced - provides a form element to display a telephone number with type and extension.
Markup Elements
- Basic HTML - provides an element to render basic HTML markup.
- Horizontal rule - provides a horizontal rule element.
- Label - provides an element for displaying the label for a form element.
- Message - provides an element to render custom, dismissible, inline status messages.
File Upload Elements
- Document File - provides a form element for uploading and saving a document.
- Image File - provides a form element for uploading and saving an image file.
Options Elements
- Buttons - provides a group of multiple buttons used for selecting a value.
- Buttons Other - provides a group of multiple buttons used for selecting a value, with the ability to enter a custom value.
- Checkboxes - provides a form element for a set of checkboxes.
- Checkboxes Other - provides a form element for a set of checkboxes, with the ability to enter a custom value.
- Image Select - provides a form element for selecting images.
- Likert - provides a form element where users can respond to multiple questions using a Likert scale.
- Radios - provides a form element for a set of radio buttons.
- Radios Other - provides a form element for a set of radio buttons, with the ability to enter a custom value.
- Select - provides a form element for a drop-down menu or scrolling selection box.
- Select Other - provides a form element for a drop-down menu or scrolling selection box, with the ability to enter a custom value.
- Table Select - provides a form element for a table with radios or checkboxes in the left column.
- Table Select Sort - provides a form element for a table with radios or checkboxes in the left column that can be sorted.
- Table Sort - provides a form element for a table of values that can be sorted.
Containers
- Container - provides an element that wraps child elements in a container.
- Details - provides an interactive element that a user can open and close.
- Fieldset - provides an element for a group of form elements.
- Flexbox Layout - provides a flex(ible) box container used to layout elements in multiple columns.
- Item - provides a display-only form element with an optional title and description.
- Section - provides an element for a section/group of form elements.
Date/Time Elements
- Date - provides a form element for date selection.
- Date/Time - provides a form element for date & time selection.
- Date List - provides a form element for date & time selection using select menus and text fields.
- Time - provides a form element for time selection.
Entity Reference Elements
If you'd like visitors to reference a piece of content on your site while completing a form, you may use an entity reference element. Maybe you would like them to select Contact information for an individual within your organization or Service that your agency provides.
An entity is a piece of content on your site. You can choose which content types you'd like to reference in the form of an auto-complete field, checkboxes for multiple references, or radio buttons for selecting a single reference.
This feature pulls in content from elsewhere on your site and avoids duplication of work and the possibility of introducing errors.
- Entity Autcomplete - provides a form element to select an entity reference using an autocompletion.
- Entity Checkboxes - provides a form element to select multiple entity references using checkboxes.
- Entity Radios - provides a form element to select a single entity reference using radio buttons.
- Entity Select - provides a form element to select a single or multiple terms displayed as hierarchical tree or as breadcrumbs using checkboxes.
- Term Select - provides a form element to select a single or multiple terms displayed as hierarchical tree or as breadcrumbs using a select menu.