Planning Out the Form
Before jumping right into the form builder, take a moment to consider what you need and put together a plan for your form.
These steps will reference this spreadsheet template in Google Sheets. When you open the spreadsheet, go to File > Make a Copy or File > Download to follow along.
The following steps outline one way to think through creating an effective form. Feel free to adjust the process according to your situation. The takeaway is to treat the form with intention, from understanding the big picture down to nailing the details of every field.
Planning out a form isn’t always straightforward. Throughout the process, you might realize a better way of collecting information that you hadn’t considered before. As you complete each step, return to your progress from previous steps to make sure everything still works.
List What You Need
To start, strip away all complexity and make just a simple list. This really points back to our first few Form Best Practices: Identify the Goals, Ask the Right Questions, and Only Ask for What You Need Now.
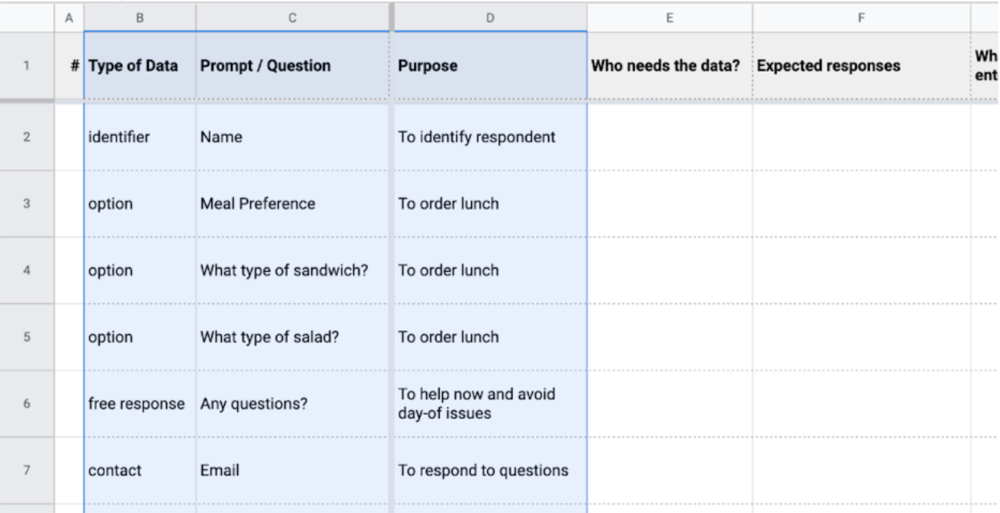
Start by identifying the broad type of data and your purpose for collecting it. You might do this at the same time as determining the specific question or prompt, but be ready to adjust the exact prompts as you better understand the needs of the form.
Complete columns B-D.

Identify the Process and Expectations
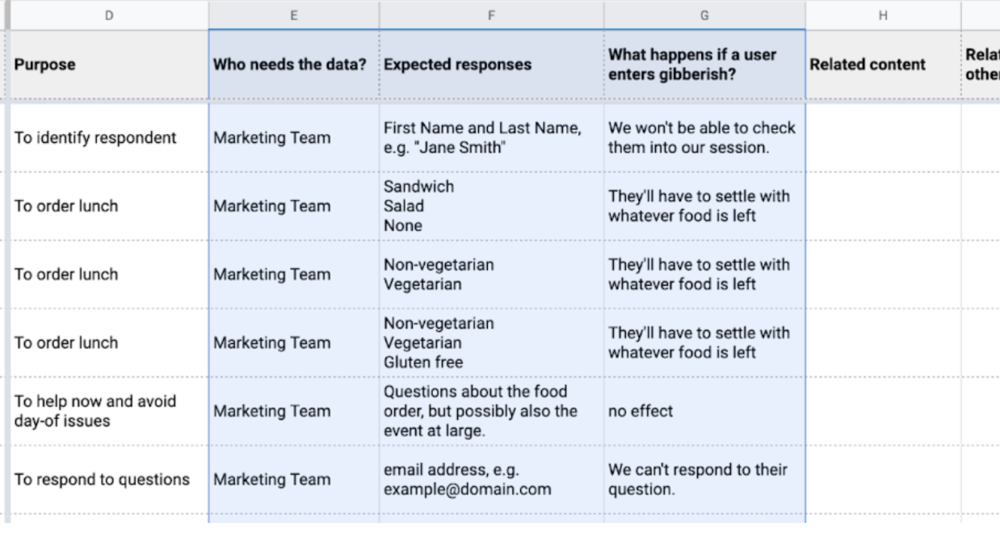
Next, consider who will be using the data, what you expect it to include, and what happens if a user enters a nonsensical response just to get through the form. If the person who ultimately needs the data is not the person who will initially need to receive the results, note that as well.
In GovHub, submission emails can be conditional based on responses. For example, a “Topic” dropdown field might determine that submissions related to one topic send an email to one person, and submissions related to another send to someone else.
With this in mind, consider what will be done with the data. This can also inform what fields to include. For example, should you be collecting phone numbers, email addresses, or both? Knowing who in your organization will handle the responses and what they will do with them might answer that question. Take another look at the prompts to see whether they’ll get you what you need in order to take action.
Complete columns E-G.
Once you’ve identified the process and expectation, ask yourself:
-
Are the expected responses the ones that I need?
-
Do the prompts need adjusting to get the responses I need?
-
How much of an issue is the effect of gibberish responses?
-
How can I mitigate gibberish responses?
Set the Order and Define Relationships
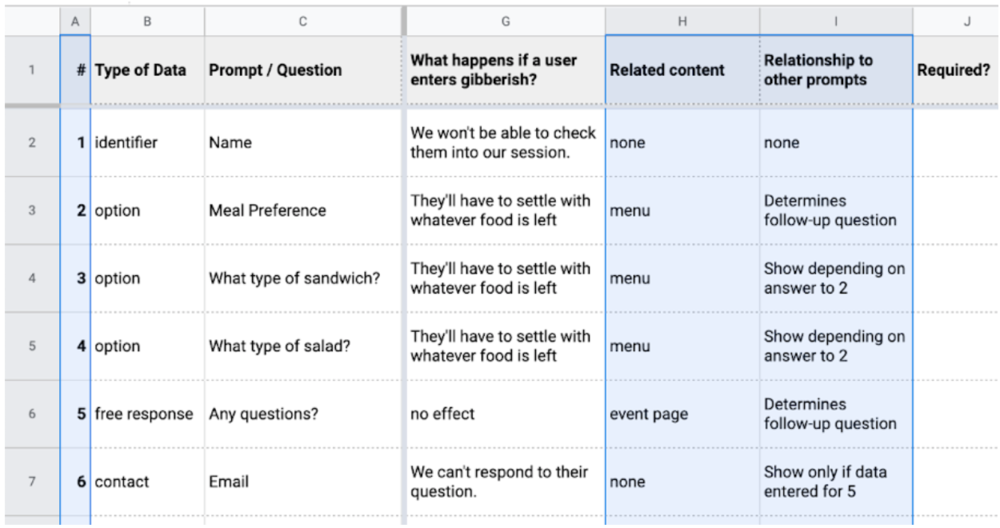
Set the order of page content, including fields in the form and even content that might exist outside of the form. What order will Encourage Self-Service?
Always consider the user’s mindset throughout each piece of the form:
-
What information makes sense together?
-
Is certain data needed from some users, but not from others?
-
Should answers to some prompts determine which other prompts display?
-
Might you need to add any follow-up prompts you don’t have already?
-
Is there related information available that might help users answer certain prompts?
Rearrange your rows as needed and complete columns A, H, and I.
Determine Element Types
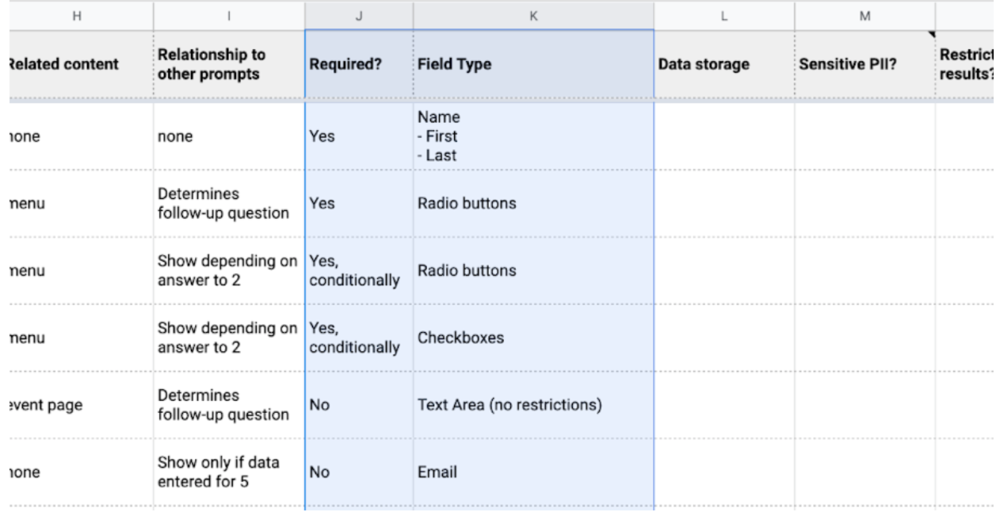
Now that you have a better picture of what you have and need, you can pick out the most appropriate Form Elements.
Complete columns J-K.
To help you decide what elements will work best, it might help at this point to open up your form builder and start Building the Form. Try adding fields and adjusting their settings. If you do, just make sure to finish thinking through these final steps.
Check for Security Needs
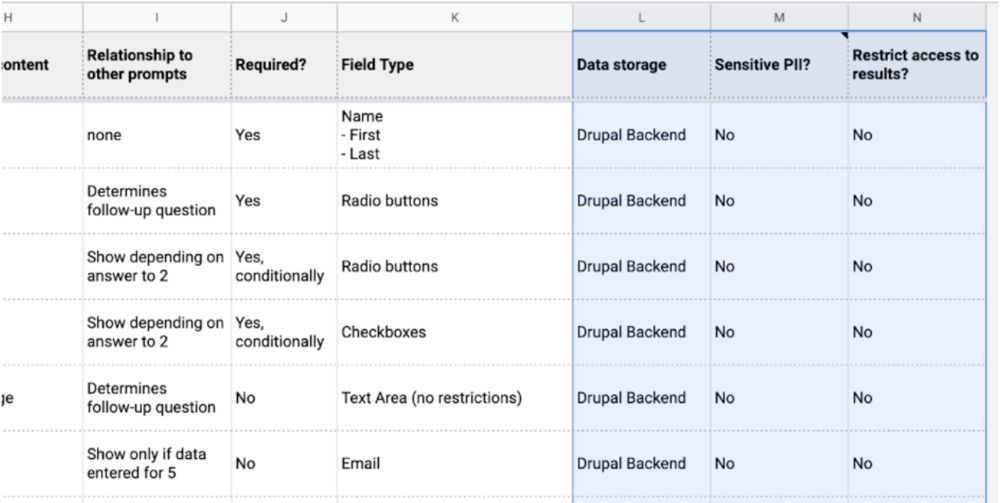
In the final step, double-check your security needs. Where will the data be stored, will it contain any Sensitive PII, and do you need to restrict who can access the results?
Complete columns L-N.
Consider the Full Process, Start to Finish
At this point, you should have a pretty clear idea of the user experience for your form. What’s next?
Users will see a confirmation page upon completion. If you have more information on a related topic or can estimate when they should expect to hear back from you, include that here.
You can also set up email confirmation messages to send automatically to the respondent (assuming they provided an email address) and someone on your team. At the most basic, include a friendly message and a review of their responses (excluding any potentially sensitive information for the sake of security).
When Success ≠ Submission
Let’s go back to the beginning and remember goals. Your goal is probably not to receive a form submission, and your user’s goal is probably not to submit a response. Ultimately, you want to provide a service and your user wants to access it.
With that in mind, there are times when a form might work best to guide users to existing information, rather than to collect data. Take advantage of Conditional Logic when you Define Relationships to continue to promote self-service. If the answer already exists, maybe the user doesn't need to contact you after all.