Making Your Documents Accessible
If the concept of web accessibility is new to you, then the notion of accessible documentation must seem bizarre. But if you stop and think about the content and purpose of the documents you provide online, they’re a part of your content inventory, so it’s very important to design them with the same accessibility standards and guidelines in mind as you design your website.
In this guide, we’ll go over the following accessibility standards and how to accomplish them:
- Creating a document structure
- Inserting alternative text descriptions
- Making your hyperlinks meaningful
- Creating an accessible PDF from Word
- Using the Accessibility Checker tool
1 Creating Document Structure
Using a conventional headings/subheading system helps both able and special needs users navigate and find information. Your heading styles should be formatted cleanly and clearly in such a way that someone could pick them out on the page and view them in the navigation pane.
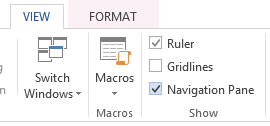
Enabling the navigation pane
In Word 2010 and up, select the View tab, go to the Show group, and check the box next to Navigation Pane.
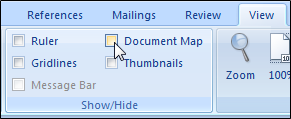
In Word 2007, select the View tab, go to the Show/Hide group, and check the box next to Document Map.
Use styles for your headings
Instead of applying direct formatting to make a heading, you should use Word’s Styles tool to construct smart formatting that lays down the skeleton for a navigable document structure. The styles are fully customizable, and if you ever decide to tweak the formatting for all of your Heading 1’s and Heading 2’s, all you have to do is update the saved style settings, and Word will automatically apply all of your changes to any text marked with a Heading 1 or Heading 2 style.
To apply a heading style, select the appropriate text, then locate the appropriate style in the Styles group on the Home tab. You should always begin with Heading 1, Heading 2, Heading 3, etc. To avoid confusing readers and causing formatting problems when you export, take care not to skip over a heading level.
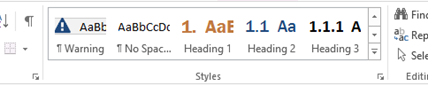
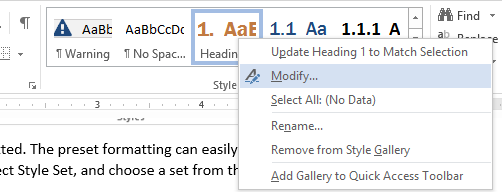
Heading styles are preformatted, but you can change the formatting by right-clicking the heading’s preview in the Styles group and selecting Modify.
Use list styles for numbered or bulleted lists
List styles help screen readers easily discern bulleted lists and ordered steps as well as preserve list formatting when exporting your document. Highlight list items, go to the Paragraph styles group on the Home tab, and select numbered or bulleted list.
Along with structuring your content, use clear, simple language that everyone—including those with cognitive disabilities—can understand.
- Use an “inverted-pyramid” style of writing: start with the most important information first. Make your point first and then explain it.
- Keep paragraphs simple. Try to keep it to one point per paragraph.
- Limit your sentences to 7 to 10 words apiece.
- Write with an active voice.
- Don’t use acronyms unless you plan to use them frequently, and always spell out the acronym on first reference. Don’t use unusual words, idioms, jargon, or slang.
- If you can accomplish the same with a simpler word, do it.
- Include a glossary to define more challenging words when you really must include them (e.g., medical or legal terminology), and provide definitions in simpler language.
2 Adding Alt Text to Images & Tables
Provide alternative text, or alt text, when a screen reader needs to understand the message provided by the images on a page. If your image contains information or represents something meaningful, determine the message the image conveys and write a short, concise text description that will convey that information. If the image is only decorative, skip the alt text so you don’t distract your users with screen readers from the more important content on the page.
When writing alt text, remember:
- Brief is better.
- Strive for informative, not poetic.
- Use complete sentences with proper punctuation.
- If the graphic includes text, put all of the words in the alt text.
- Follow the inverted-triangle method and put the most important information first. For example, "Acme Logo: Sun rising over white sand dunes" is better than "Sun rising over white sand dunes: Acme Logo".
- Check your spelling and try to avoid abbreviations or acronyms unless they have been previously defined. Screen readers will mispronounce words that are misspelled.
- Don’t include any information that’s already present in the caption.
- Describe the function of the image, especially if the image is a link. “Search the Card Catalog" is much more useful than "Photo of a collection of books and other reading materials scattered on a library table".
- Always provide alt text for images that are links. If you don’t, the screen reader reads the title of the image.
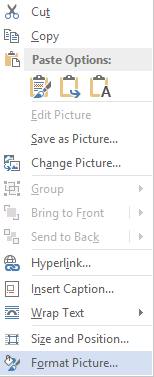
Image alt text
- Right-click the image.
- Select Format Picture.
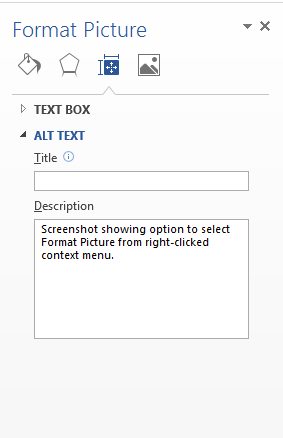
- Select the Alt Text option from the list.
- Add summary alt text in the description entry area.
Use table styles
Using tables in your documents greatly increases the amount of information a screen reader must dictate to the user. First, the reader announces the the number of rows and columns, then recounts the contents for every single cell in the table. This is a long, laborious process, and you run the risk of your user getting distracted or losing interest quickly.
If you must use a table, only use it for tabular data, not plain text. Accessible tables should indicate which cells are for headers and which are for rows. Without those labels, people using assistive technology won’t be able to make sense of the information. Sometimes the reader will speak out the information in a different order than it appears. To avoid these issues, use table styles when developing a table structure.
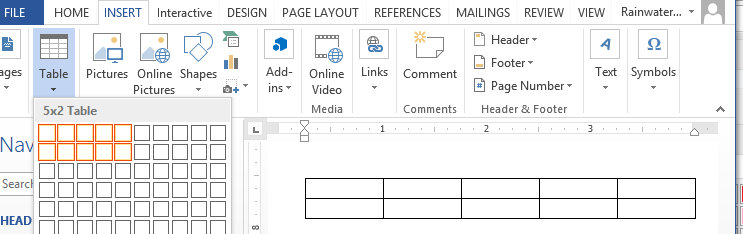
To add a table with headings:
- Go to the Insert tab on the Word ribbon.
- In the Tables section, select the Tables icon.
- Select the number of rows and columns for your table.
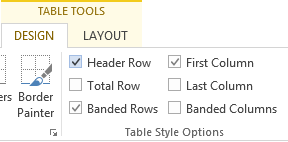
- Select the inserted table by clicking its border. When the table is selected, the Table Tools menu appears.
- Click on Table Tools > Design.
- In the Table Styles Options group, check the box next to Header Row.
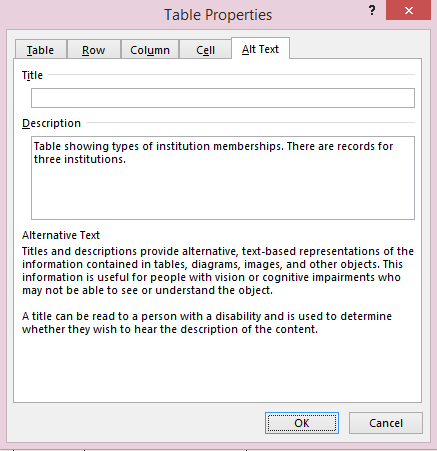
Adding alt text to tables
Feel like your content would really benefit from a table but don’t want to put your users through that narration nightmare? Good news! The same way alt text can convey the meaning of an image, the alt text in a table provides users of screen readers the same summary information that sighted users get when quickly browsing a table.
To add alt text to your tables:
- Right-click the table.
- Select Table Properties.
- Select the Alt Text tab.
- Enter the summary information for the table in the Description field.
3 Hyperlinks with Context
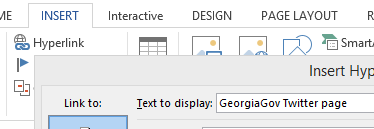
Accessible links use meaningful text in the hyperlink’s readable text is a best practice to create meaningful text for hyperlinks. Users with a screen reader can even request a list of links on a page, and a page full of anonymous “click here”s is a great way to keep someone from clicking on anything.
To add a hyperlink:
- Highlight the hyperlink text.
- Click on the Insert tab and select Hyperlink in the Links group.
- Enter your hyperlink URL.
- Click OK.
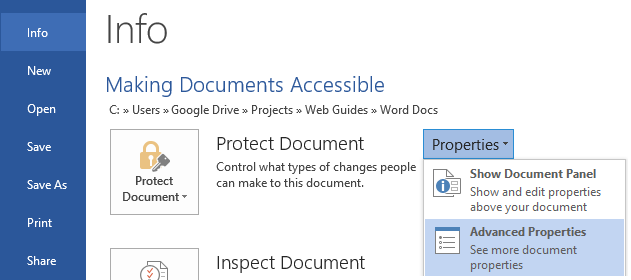
Document properties & metadata
Accurate document properties make it easier to identify and locate information.
To ensure the accuracy of document properties:
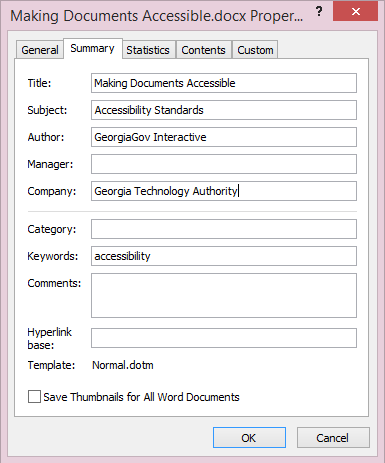
Select the File tab, click on the Properties button at the right of the Info screen, and select Advanced Properties from the drop-down menu.
Select the Summary tab. Complete the Title, Author, and any additional fields if desired.
4 Turning Accessible Word Docs into Accessible PDFs
Microsoft Word 2010 and beyond includes the option to save documents and export them as PDF files while preserving accessible formatting.
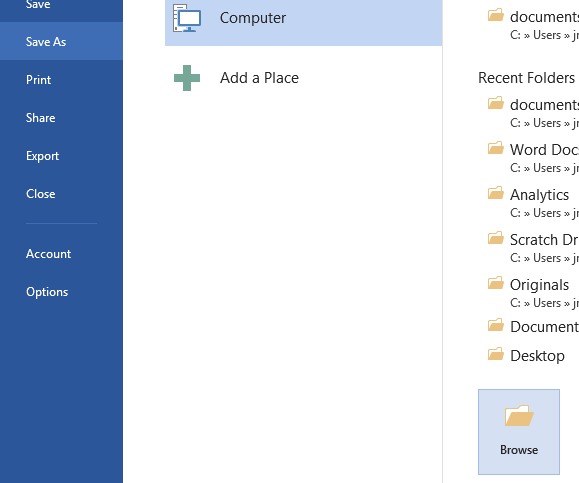
- Click File and select Save As.
For Word 2013 and newer, only: Click the Browse folder on the Save As page.
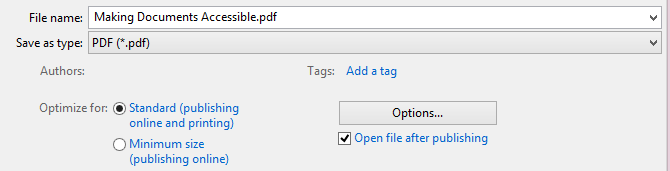
- Choose PDF from the Save as type menu.
- Click Options… to launch the PDF Options menu.
- Under Include non-printing information, check the boxes next to:
- Create bookmarks using Headings
- Document properties
- Document structure tags for accessibility
- Click OK.
- Click Save.
Adobe PDF Maker
The Adobe PDF Maker is an add-in extension for Word that is available to people with Adobe Acrobat Professional installed. In addition to formatted lists and alternative text descriptions, Adobe PDF Maker offers features such as bookmarks for navigation and structure as well as tags to enhance screen reader functionality.
If you have Adobe PDF Maker, simply select Save as PDF from the File menu.
5 Using the Accessibility Checker
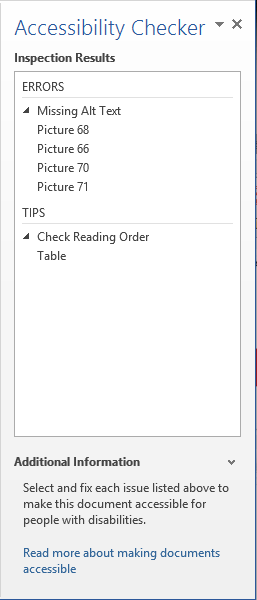
For software from 2010 and later, Microsoft Office has a built-in Accessibility Checker that can analyze your files and measure how well they adhere to accessibility best practices. After reviewing your material, Accessibility Checker compiles a report of any errors as well as a list of tips for resolving the problems.
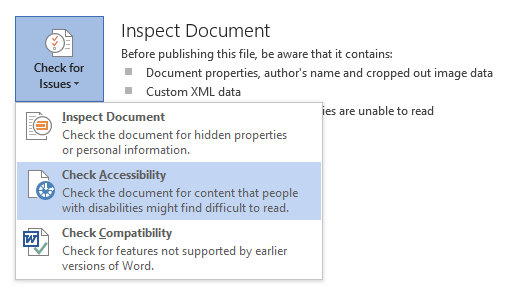
To launch the Accessibility Checker, go to File, click the Check for Issues button, and select Check Accessibility from the dropdown menu.
6 Conclusion
Accessibility compliance has a very high payoff relative to the investment. These are small accommodations that can equate to a massive boost in someone’s quality of living. As Internet access grows increasingly more crucial in practically every aspect of living, achieving a truly accessible web has never been more important. It is essential that the Web be accessible to provide equal access and equal opportunity to people, regardless of ability.
Neglecting accessibility means neglecting whole groups of people such as the visually impaired, hearing impaired, colorblind, cognitively impaired, and severely motor-impaired. If a government is to be of the people, by the people, and for the people, we must prioritize accessibility to ensure it is for all the people.