Illustration: Principles of Images
An official website of the State of Georgia.
The .gov means it’s official.
Local, state, and federal government websites often end in .gov. State of Georgia government websites and email systems use “georgia.gov” or “ga.gov” at the end of the address. Before sharing sensitive or personal information, make sure you’re on an official state website.
Still not sure?
Call 1-800-GEORGIA to verify that a website is an official website of the State of Georgia.
October 11, 2016
This is the second post in a 2-part series guide for content managers to adhere to Digital Services Georgia's 3 principles.
As the government, we are responsible for making our websites responsive, accessible, and performant. These are our platform’s 3 guiding principles, and it’s imperative that we take them each into consideration for every piece of content that we publish.
In the first piece of this 2-part blog series, we looked at how text, tables, and documents can adhere to the 3 principles. Now, let’s go a step further with images and videos.
Images can clarify information, draw interest, set a mood, and spice up an otherwise plain page. But before you grab the complete contents of your photo folder and throw them on your homepage, be sure that you take the images through some important steps.
Make sure that the pixel dimensions for your images are as big and no bigger than the largest they will appear on the site.
If you host a blog, you’ll want to consider the width of the blog post column: 740 pixels. If you have other pages with only a right sidebar (and no navigation on the left), this will be the width of the main column. If a page on our platform has only a single column without any sidebars or side navigation, the max width will be 940 pixels.
It’s also important to note that our platform limits images to 1200 pixels high, and will shrink images taller than 1200 pixels proportionally. In most cases, the height restriction shouldn’t be a problem. Infographics are one of the few — or only — types of images that you might publish on your agency website which are frequently taller than 1200 pixels.
No matter what, ALWAYS optimize your images before putting them online. As we discovered when going through our platform performance initiative, images really are the biggest difference between a slow, heavyweight site and a quick one. We need to make sure that our images are as small of a file size as they can possibly be without loosing quality.
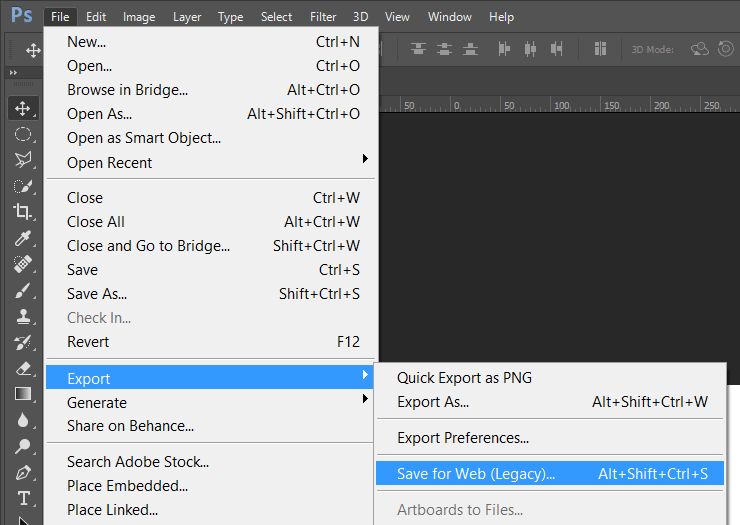
Don’t just export your photos and put them on the website. Use the “Save for Web” option in Photoshop or Gimp to lower the file size. Pick the right type of file for your image (typically JPEG for photographs and PNG-24 for flat graphic images). Further shrink your files with compressjpeg.com and compresspng.com.
Our users don’t want to wait three minutes for a page to load, and they don’t want to blow through their data plans while doing it. Let’s accommodate.
In many cases, images on a webpage are decorative. Decorative images don’t need any special treatment because a user will still fully understand the information presented even if they can’t see the image. Of course, you’ll still want to be very careful when choosing to include decorative images on your website, since images always take additional time and bandwidth when loading a page.
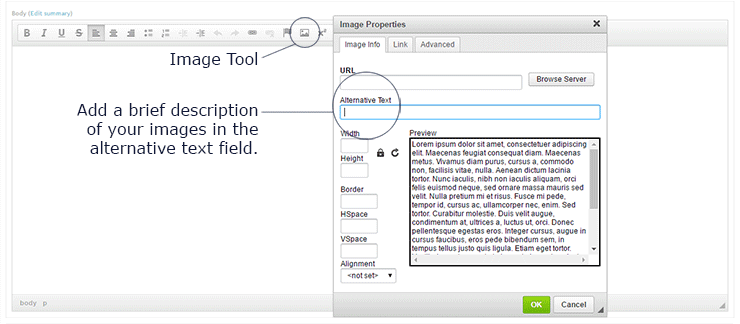
Any time you publish images online that add useful information or function to the page, use alternative text (alt text). Use alt text to describe the meaning of the image. Keep your description brief (typically under 120 characters) and functional.
In general, it’s best to keep text out of images. If you do include text, it should be very brief and included in the alt text. (Infographics are a different story, but again, you can reference my previous blog post on infographics for more information.)
Make sure that any text in images and other important information — such as graphs and charts — have accessible color contrast from their backgrounds. Online tools, such as WebAIM’s Color Contrast Checker, can help you find accessible colors.
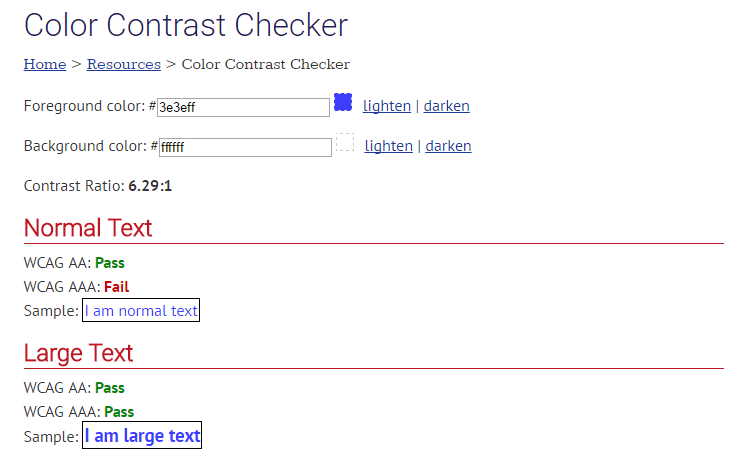
We recommend that your Color Contrast earns a “Pass” report for at least WCAG AA as Normal Text and both levels of WCAG as Large Text.
We offer a few ways for you to display images on our platform that consider responsiveness and performance.
The Structured Image field is available on Site Pages and Blog posts. With this field, you can upload a large, landscape image which will sit at the top of the page at the column’s full width. We recommend using this field when appropriate because it will actually shrink the image’s file size when users open the page on smaller devices.
If you have lots of images that you want to show in a slideshow format, consider using the Photo Gallery content type. Each image can have its own caption, displayed while users click through this responsive display. We use Photo Galleries in our GOVTalks archive pages to highlight speakers and particular moments from the event.
In an upcoming release, our platform will have a new way to work with content such as images. The new functionality, called Columns, will give you more flexibility in inserting images and infographics onto your Site Pages and Blog posts. Keep an eye out in the coming months for more information and training for using Columns.
These days, videos are the big, exciting thing taking over the internet. They dominate social media, but even if you don’t have a Facebook, Twitter, Instagram, Snapchat, or Periscope account, you can take advantage of this exciting media form to reach your audience in new ways.
To include videos on your website, you do need either a YouTube or Vimeo account. (I’ll focus on YouTube now, because of its ease of use and overwhelming popularity.)
With our Video content type, all you need to do is paste the video URL in the right place, and voilà! The video is on your website. When you embed the video node onto your site pages, it is already responsive and ready to go. While you can embed video codes directly into the WYSIWYG, we highly recommend using the Video content type to ensure the display of your videos updates along with the rest of our platform.
Videos and accessibility go hand-in-hand since they typically include both audio and visuals.
When you publish your videos online, make sure to include closed captions. With any video uploaded, YouTube automatically fills in computer-generated captions. While computerized speech-to-text transcription is constantly improving, it’s still far from perfect, but feel free to use these auto-captions as a starting point for further edits.
Another great option for captions is to upload a prepared transcript to your video, and YouTube will add the timings. Again, there is definitely room for error, so you’ll want to check back through your video to make sure the timing of the captions closely matches the timing of the video. Writing transcripts from audio can be a time-consuming task, so if your video is speaker-heavy and longer than a few minutes, you might want to find a professional transcription service to lighten your load.
You should also make sure that your videos make sense to someone who can’t see them. Whenever possible, it’s best to prepare audio that includes all of the necessary information without the assistance of visuals. For example, instead of saying, “Take a look at these three points for a high-level view of what we’ll discuss today,” a voice over could say, “These three points - [point 1], [point 2], and [point 3] — give you a high-level view…”.
Learn more about video accessibility from WebAIM.
Since we don’t host videos directly on our platform, performance — in terms of bandwidth usage — shouldn’t be much of a concern. Related to performance, however, it’s important to make sure that your videos display how you expect.
YouTube videos always display at a 16:9 aspect ratio (think 1280 pixels wide and 720 pixels high). This is a standard ratio that most cameras will abide by automatically when set to record video. However, there might be times that your videos step outside of this size — if you take vertical video on your phone, or if you compile a video from a sequence of photographs (often at 4:3 ratio), for example.
When your video proportions don’t match up with YouTube’s proportions, you have a few options. If you work in a video editing software, even if your raw footage isn’t the right proportions, you should always have the option to export the video at 16:9.
YouTube also has some fixes for this issue. YouTube’s default fix is to add black bars either on the sides (pillar boxes) or top and bottom (letter boxes) of the video to fill in any extra space. If you want to explore other display options, consider using video formatting tags.
Or maybe: Check twice, publish once. Before you publish anything on the internet, double- and triple-check your content first! On your website, save the page as a draft and take a look. On YouTube, upload videos in Private or Unlisted mode before setting them to Public. Read through it, look at it and watch it more times than you think you need to, and then send it to your co-workers to proof as well.
As a government agency, you get a lot of eyes on your website. You don’t want someone to visit your website on a mobile device and leave frustrated because you forgot to compress the images and the page took too long to load.
Our platform is responsive, accessible, and performant. Make sure all of your content is too.