Webform Guide Illustration
An official website of the State of Georgia.
The .gov means it’s official.
Local, state, and federal government websites often end in .gov. State of Georgia government websites and email systems use “georgia.gov” or “ga.gov” at the end of the address. Before sharing sensitive or personal information, make sure you’re on an official state website.
Still not sure?
Call 1-800-GEORGIA to verify that a website is an official website of the State of Georgia.
August 11, 2021
Chances are you have at least one form on your website. You might use forms for users to ask questions, submit feedback, register for an event, or contact your agency for any reason.
The majority of your website is a one-way road. While typical site content comes from you (the agency) to users, forms reverse the traffic flow. With forms, data moves from users to you. By taking advantage of this interactivity, you can improve users’ experience with your website and help them find what they need more efficiently.
I’ll keep this simple (like you should keep your forms). However you’re using Webforms — whether to gather data, to guide a process, or both — there are some basic best practices to keep in mind. A lot goes into making an effective form, but here are a few guiding principles:
Because of the opportunity for users to provide — rather than solely receive — information, we can use GovHub’s Webforms for so much more than pure data collection. You can use Webforms to help users figure out their next steps or to navigate a complex process. Webforms can answer user questions in real-time.
For example, the Division of Aging Services (DAS) uses a Webform to help older adults know their level of risk for social isolation. We helped DAS set up this form to associate scores with each response and add them up. The form then provides different next steps based on the result; a final score above a defined threshold results in a simple message, but a lower score presents users with new fields to request help.
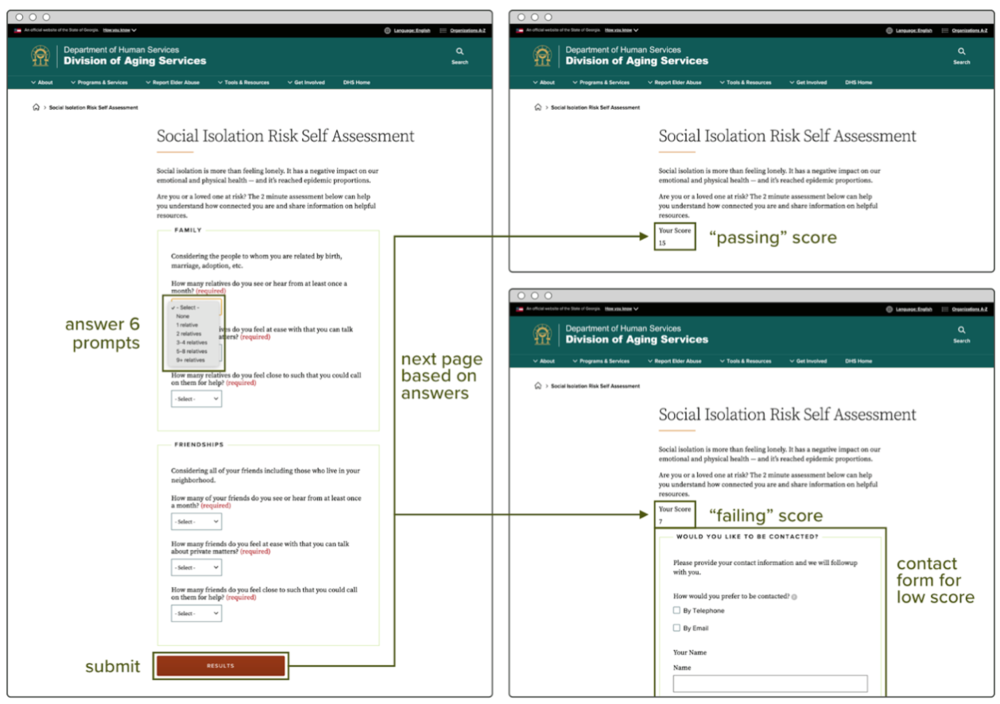
You could present this same information in just a static page of content, but the interaction engages users and helps them find the information that is directly relevant to their situation.
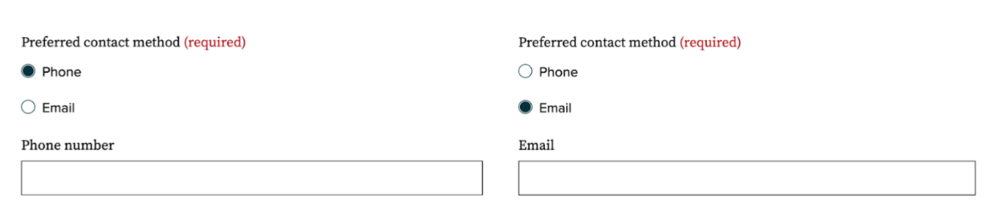
The key to unlocking a better user experience through forms is conditional logic. Conditional logic is a feature in many digital form builders, like GovHub’s Webforms, that tailors the form based on user input. A common way this comes into play is making a field visible or hidden depending on the user’s response to another field. It can also affect the state (enabled/disabled), validation (required/optional), and more.
For example, consider a field labeled “Preferred contact method” with two radio buttons: “Phone” and “Email.” Depending on which option the user chooses, you will need different types of information from them. To get what you need, you can set the conditions on two separate Phone and Email fields to display depending on which method the user selects.
The form provides a prompt, users respond to this prompt, and the form reacts to their response. This is a simple way to personalize the process, making it easier and more clear for users.
With all this in mind, put together a plan for your form. I find it helpful to step away from the CMS and jot down what we need on paper or in a spreadsheet.
Try out our Form Planning Template for a little help gathering your thoughts. When you open the spreadsheet, go to File > Make a Copy or File > Download to get started. I recommend filling out the sheet in this order:
One last item before you log into GovHub: Consider the full process, start to finish. When users submit the form, what do they see? When you receive form results, what do you do with them? And of course, make sure to thoroughly test your form to confirm its requirements and interactions before you hit publish.
When you get into the system and build the form, it can be a lot to take in all at once. It’s easy to rush through and make choices that ultimately are not for the best. By starting with a plan, you can build the form with confidence, knowing that every decision will create a solid user experience and usable results.
Get started now! Depending on your situation, you might take one of three routes:
Make sure to check out our new Webforms Guide for a full run down on the guidelines, a detailed walkthrough on creating a plan, and everything to know on building forms in GovHub. And for more creative examples of how editors are using Webforms to their (and their users’) advantage, watch this recording from our latest GOVTalks: